F
or a long period in my life pie was my culinary nemesis. When people would use the expression (or is it an idiom?) “easy as pie” I was genuinely confused. Was this a sarcastic statement or were there people in the world who honestly thought pie was easy to make? And, if it was so easy for them to make, what in the world was I doing wrong? I think my lack of interest to conquer making pie came from my lack of interest in pie itself. I was the kid who ate the filling but left the crust behind. When I became a mother and started hosting my own Thanksgiving dinners, I knew this hate-hate relationship I had with pie would have to change. I decided to conquer pie, if for no other reason than to say Thanksgiving dinner had a homemade pie on the table.
I began doing my homework and learned that I probably hated pie because I wasn’t eating quality pie. I learned that there are four types of short-crust pastry (the type of pastry used for making pie). Pate a foncer is a french pastry that includes egg and a small amount of sugar, this pastry is rich and perfect for tarts that shouldnt be overly sweet. Pate brisee is similar to pate a foncer but incorporates more butter allowing for a lighter crust. It usually has little to no sugar and is perfect for savory pies such as chicken pot pie. Pate sucree is made with a little more sugar which inhibits the gluten strands allowing for the perfect crumble and in my opinion creating the perfect pie crust. Pate sablee is basically a shortbread or cookie crust. It very often has the same ingredients as pate sucree but the process for making it involves creaming the butter, sugar and eggs before flour is incorporated. This is the perfect crust for dainty little tea tarts.
What I have learned is that great pie starts with great ingredients. Just because I don’t like to use vegetable shortening in…well anything, doesn’t mean I don’t understand why people use it. Butter has a lower melting point than shortening and lard making them much easier to work with than butter. So the challenge becomes learning tips and tricks that allow you to use the best ingredients, handle the dough less and create a perfectly flavorful, flaky pie crust. Over the years I have tried it all…shortening, lard, a mixture of two fats, all trying to balance flavor with function. I am here to tell you with this recipe and the step by step instructions and tips, you don’t have to sacrifice any flavor. This recipe uses all butter creating amazing flavor in a perfectly flaky crust. I now love making pie and love eating it even more. Please read all of the instructions after the ingredients. This is one recipe that the steps involved are as important, if not more important than the ingredients themselves. Some of my tips may seem crazy…but trust me. This recipe makes baking pie so easy you will become the star of Thanksgiving dinner!
Ingredients:
2 1/2 cups spooned and leveled flour (spooning avoids packed “heavy” flour)
1/4 cup sugar
1 tsp. salt
1 cup frozen butter
5 Tbsp. Ice cold water
Instructions:
- Before you begin, freeze the butter you will be using…you heard me right freeze the butter.
- Once frozen you can grate the butter on a hand grater or if your food processor allows the grating attachment to be used with the chopping attachment use it.
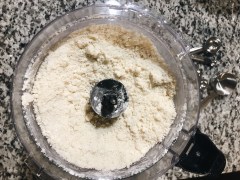
- put frozen grated butter into the food processor and add the flour, salt, and sugar. pule until incorporate. Scrape down then pulse again.
- Nest, add cold water and pulse until crumbly.
- Dump the contents of the food processor onto about a 2 foot section of parchment paper.

- DO NOT knead the dough. You are going to repeatedly press the dough with the parchment paper. Fold the parchment paper onto itself and press the dough underneath. Continue to fold the parchment paper alternating horizontally and vertically pressing in between each fold. If the dough is dry and not binding spray the dough with a spray bottle filled with cold water. Some people use vodka as it evaporates and inhibits gluten, vinegar does the same thing. I just use plain water with ice cubes floating in the spray bottle. This will allow binding of the dough but avoids adding too much water inhibiting gluten that toughens dough. It is like making puff pastry or croissants. You are creating layers of dough speckled with butter…creating the perfect flake.
 Processed with VSCO with a6 preset
 Processed with VSCO with a6 preset
 Processed with VSCO with a6 preset
 Processed with VSCO with a6 preset
 - Form dough into a disk and wrap with plastic wrap. This dough is generous and can be divided in two depending on the size of your pan.

- Place dough in the refrigerator and chill at least 1/2 hour before using. If you refrigerate longer just be sure to let the dough sit 15-30 minutes before using so it is malleable enough to roll.
- Place dough on lightly floured piece of parchment paper. Begin by pressing the rolling pin on the dough rather than “rolling” it. This helps insure the dough depth will be consistent.

- When dough is rolled, invert pie pan in center of dough and flip the pan and dough using the parchment paper.
- Remove parchment paper and form dough into pan.
- Trim dough with scissors an inch wider than rim of pie pan.
- Fold this extra inch of dough underneath itself creating smooth dough to crimp.
- Crimp using any method you prefer but be sure to crimp, sealing the dough to the pan, after pie dough is crimped, dock with a fork

- Freeze the shell for 30 minutes before baking.
- Follow recipe for the specific pie you are making for temperature and baking instructions.


Pingback: Extra Creamy Pumpkin Pie |
Pingback: Amazing Apple Pie |
Pingback: Perfect Top Pecan Pie |
Pingback: Lemon Sour Cream Pie |
Pingback: No-bake Cherry Cheese Pie |